The Team: Ryan Miller, Lucy Ostrowski, Madison Brand, Luke Venezia
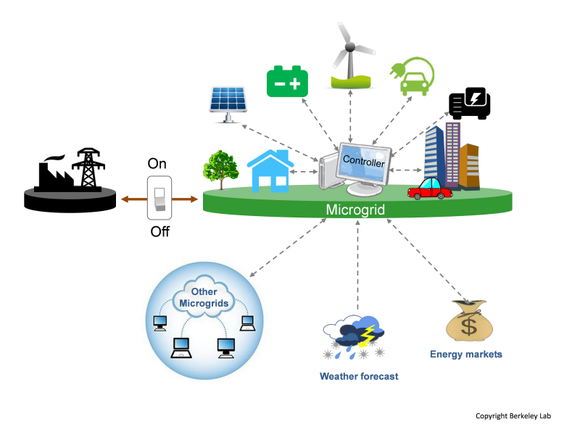
This project is an extension of the Arduino programming project, but for the sake of simplicity I broke it up into two separate pages. After our Ardunio project, we used the our previous knowledge to relate to our modern day electrical system. However our teacher took a different approach, instead of trying to relate this to our national power grid, we instead looked at micro grids. Micro grids are local power systems that can be disconnected from our national grid and still run on their own. This is mostly achieved with natural energy producers such as solar, wind, hydro, etc. or by making man made power sources such as coal, gas, and oil more efficient. We were tasked with building a micro grid for either our school(San Marin) or for the town of Novato. Our group decided to make one for the town of Novato in order to incorporate more energy options, and a more realistic approach.
Wind Turbine Lab
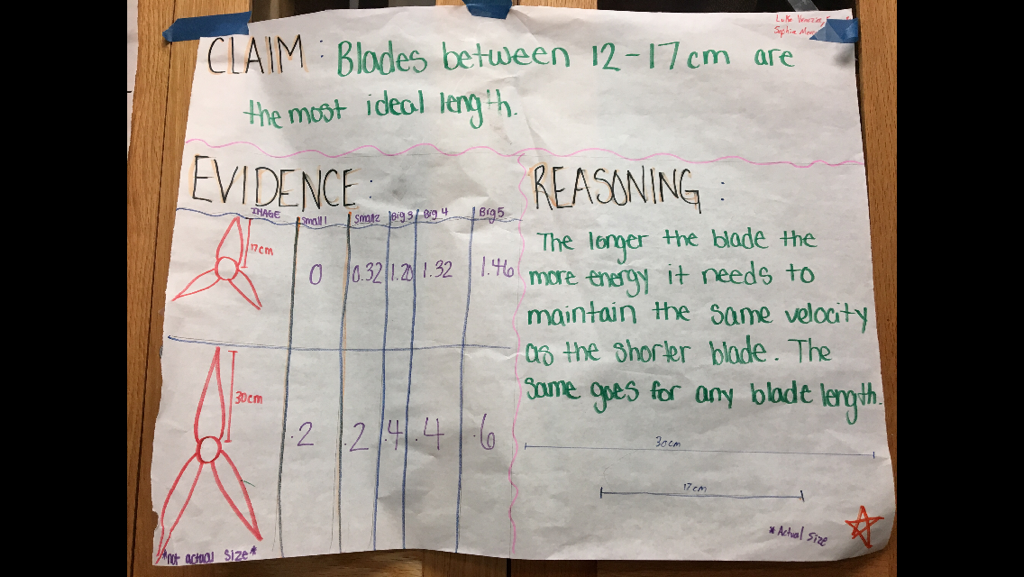
This was our first lab to start prepping us for our micro grid project. It was about the blades on a wind turbine and how they work. Before he taught us anything he told us to use different materials, shapes, numbers, and angles of the the blades and to pick a single variable to prove right or wrong. We choose the length of the blade. We took several test running from no blades at all to over 25 cm blades. After testing we concluded that the best length for a wind turbine of our size was 12-17 cm. We could not find an exact measurement because of how consistent the numbers were so instead we gave a range. The reason it is this long is because it is the perfect balance between surface area and weight. In order to get more energy out of the wind turbine you need more surface area, but more surface area means more weight, and more weight means less speed. In order to achieve the most amount of energy you must find the perfect balance between surface area and weight.
|
|
Electromagnet Lab
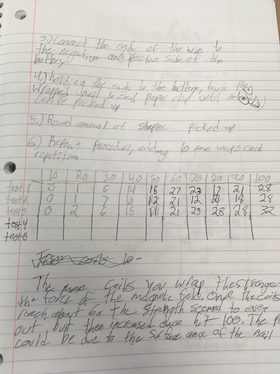
For this lab we had to create our own electromagnet, using a nail, 36 gauge insulated copper wire, and a battery. We were then told to test a single variable and then prove it true or false. We choose to do the number of wraps vs the strength of the electromagnet. We first started with 10 wraps and did 3 tests. From there we added 10 wraps each time and for every set of wraps we had, we did three tests and averaged it. We found that, like we predicted, the more wraps that you have on an electromagnet the stronger that magnet would get. We tested this by picking up staples and seeing if they increased the more wraps we put on. Up until around 70 we had a constant increase of strength. Once we reached 70 however the strength decreased substantially and eventually evened out at 28 staples. We believe this to happen because there is not enough surface area for the nail to hold more then 30 staples. Our ending statement was that yes the wraps you have on an electromagnet the stronger it gets. However the surface area of the magnet has to be increased in order to be able to use the full force of the magnet.
Electrical Fields
One of the most crucial labs to understand this project was electrical fields and static electricity. We did two activities to learn about this, electrical field hockey. This is where we used positive and negative fields to get a hockey puck into a net. This showed us how the positive and negative electrical fields along with how they react to each other. We also did the sticky tape lab. This showed us how static electricity acts on different things such as pushing and pulling against each other. To make it more simple, we basically created adhesion. To help us even more we used online simulators which can be accessed below. My lab worksheet for the sticky tape lab along with questions about electrical fields can be seen below.
Electric Field Hockey- http://www.physicsclassroom.com/Physics-Interactives/Static-Electricity/Put-the-Charge-in-the-Goal/Put-the-Charge-in-the-Goal-Interactive
Electric Charge- http://www.physicsclassroom.com/Physics-Interactives/Static-Electricity/Put-the-Charge-in-the-Goal/Put-the-Charge-in-the-Goal-Interactive
|
|
|
Dissecting a Motor
Now most of our teaching is through lessons taught by Mr. Williams, but for this lab it was a more hands on experience. The class was split up into groups and given two motors, one large one and one small one. We were then able to take apart the motors to figure out how they worked on the inside. The first motor contained two magnets, copper wire, and had three main parts. The second motor was a larger one that you could most likely find in your car. When we finished dissecting the motors we discussed our findings in class. We found that the motors basically give off electrical fields which is then transferred into electrical current.

Novato Micro grid Project
Once we had all the necessary information from our labs, and field trip to the self sufficient Sonoma farm we were asked to design a micro grid for Novato or San Marin. We decided to do one for San Marin. To start off we had to figure out how much electricity Novato uses annually, and then satisfy those needs through different electricity producers. We also decided, as a group, to keep the micro grid on the cleaner scale, using as much clean energy as we could. In total we used 4 different types of energy producers as well as batteries. Our first energy producer was solar panels. In order to use as little space as possible we would install these on people's roof with their permission and offer them free solar panels and electricity for their home. This covers most of our usage but not all so we also would put 20 wind turbines on the surrounding mountains in order to get the highest amount of wind. The last energy producer we have is biomass generators. The way these work are by taking excess biomass such as wood chips, bark, and moss and then burning it to get energy. Although it does produce emissions it is limited to the amount of carbon in the plants, which would eventually be let into the atmosphere. Since solar is a large part of our micro grid we would have to have some way to store the excess energy for rainy days. So we decided to use hydrogen as our battery. In the summer we would turn any excess energy into hydrogen and store this in big tanks underground. In the winter we would break the hydrogen back apart which creates energy that we can use throughout our grid. In order to save money we would connect all of this into our current electrical lines that way we only have to rewire some parts of Novato. Below is our slideshow that we made for this project.
